Using a Polarizing Filter-
By Rob Stapleton/Alaskafoto Copyright 2021
Use of a polarizing filter can be spectacular for color photography.
My use of circular polarizers goes way back to the 35mm Single lens reflex days shooting Kodachrome 25 transparency (slide) film also known as Kodachrome II movie transparency film (two) it had an ISO (then ASA) rating of 25 ASA very low and slow film but rich with color. In this digital era Kodachrome is no longer viable as the chemistry and equipment to process it has been terminated.
Using the polarizer does just that it polarizes the light best at right angles to the sun and renders the image with darker rich blue skies and any clouds in the scene pop with detail and contrast.
Most circular polarizers have two pieces of glass one with screw threads used to mount on the lens and the other that rotates in the body of the metal ring. These are complete in a metal ringed filter. First be careful to screw in the filter and not to over wrench the threads. Circular polarizers are difficult to remove if installed too tightly.
Point your camera in bright light, with the main source 90 degrees on the right or left side from the forward position of the camera. Rotate the outer ring of the filter and you will see that the reflection on a window, or a parked car windshield dissipates, and you can view through the glass. The same is true with water. Keep rotating until you see through whatever has a reflection or when the sky becomes an azure blue.
While doing this you will note that when in manual mode or using the speed/time priority dial those exposures will be underexposed. Depending on the light brightness, and the density of the polarizing glass will need an exposure adjustment. Usually this is from -1.5 F/stop to -2 F/stops as you rotate the forward circular ring of the polarizer.
A polarizer does not work well indoors and any type of artificially lit subjects. Yes, you can do it, but it requires stronger light, or a higher ISO rating to equalize for proper exposure. Some photographers use them as a neutral density filer to increase the F/stop to narrow an image depth of field.
In years past when photographing artwork special lights were used to light the artwork. Each light had polarizing filters on them so that there would be no reflection and the image would be evenly lit.
Do use one, screw it on the front of your lens until slightly tight, then you can rotate the filter and view the difference in either DLSR or mirrorless cameras. You can find circular polarizers by checking the lens diameter which is usually printed on the ring that holds the front elements in your camera lens or on the outside of the lens barrel. Most common circular polarizers are the 58mm, 62mm,67mm, 72mm and 77mm. Usually the price increases with the larger diameter filters.
Which Brand of Polarizing Filter is best?
There are many different brands of filters, Hoya, CPL, Tiffen Cokin, Marumi, B+W and Platinum are just a few brands. Cokin and Marumi have special filter holder adapters that screw on your lens that allows using square or circular polarizing and neutral density filters.
The difference in price of these brands is usually the aluminum or, brass metal ring. The latter is the most expensive. Another factor is optical quality and light transmission which also affect the price of the filter.
My experience has shown me that the best coatings on the glass the more expensive the filter, and the quality of the ring threads. Most retail camera stores sell polarizers and UV filters, and some of the filters claim to be better for digital than others but I have not tested them scientifically or seen any reviews. Now, due to Covid-19 we are lucky to find any filters, so I am going with what I can readily purchase.
Check back for further comparisons and scientific information about polarizers in an upcoming writing.
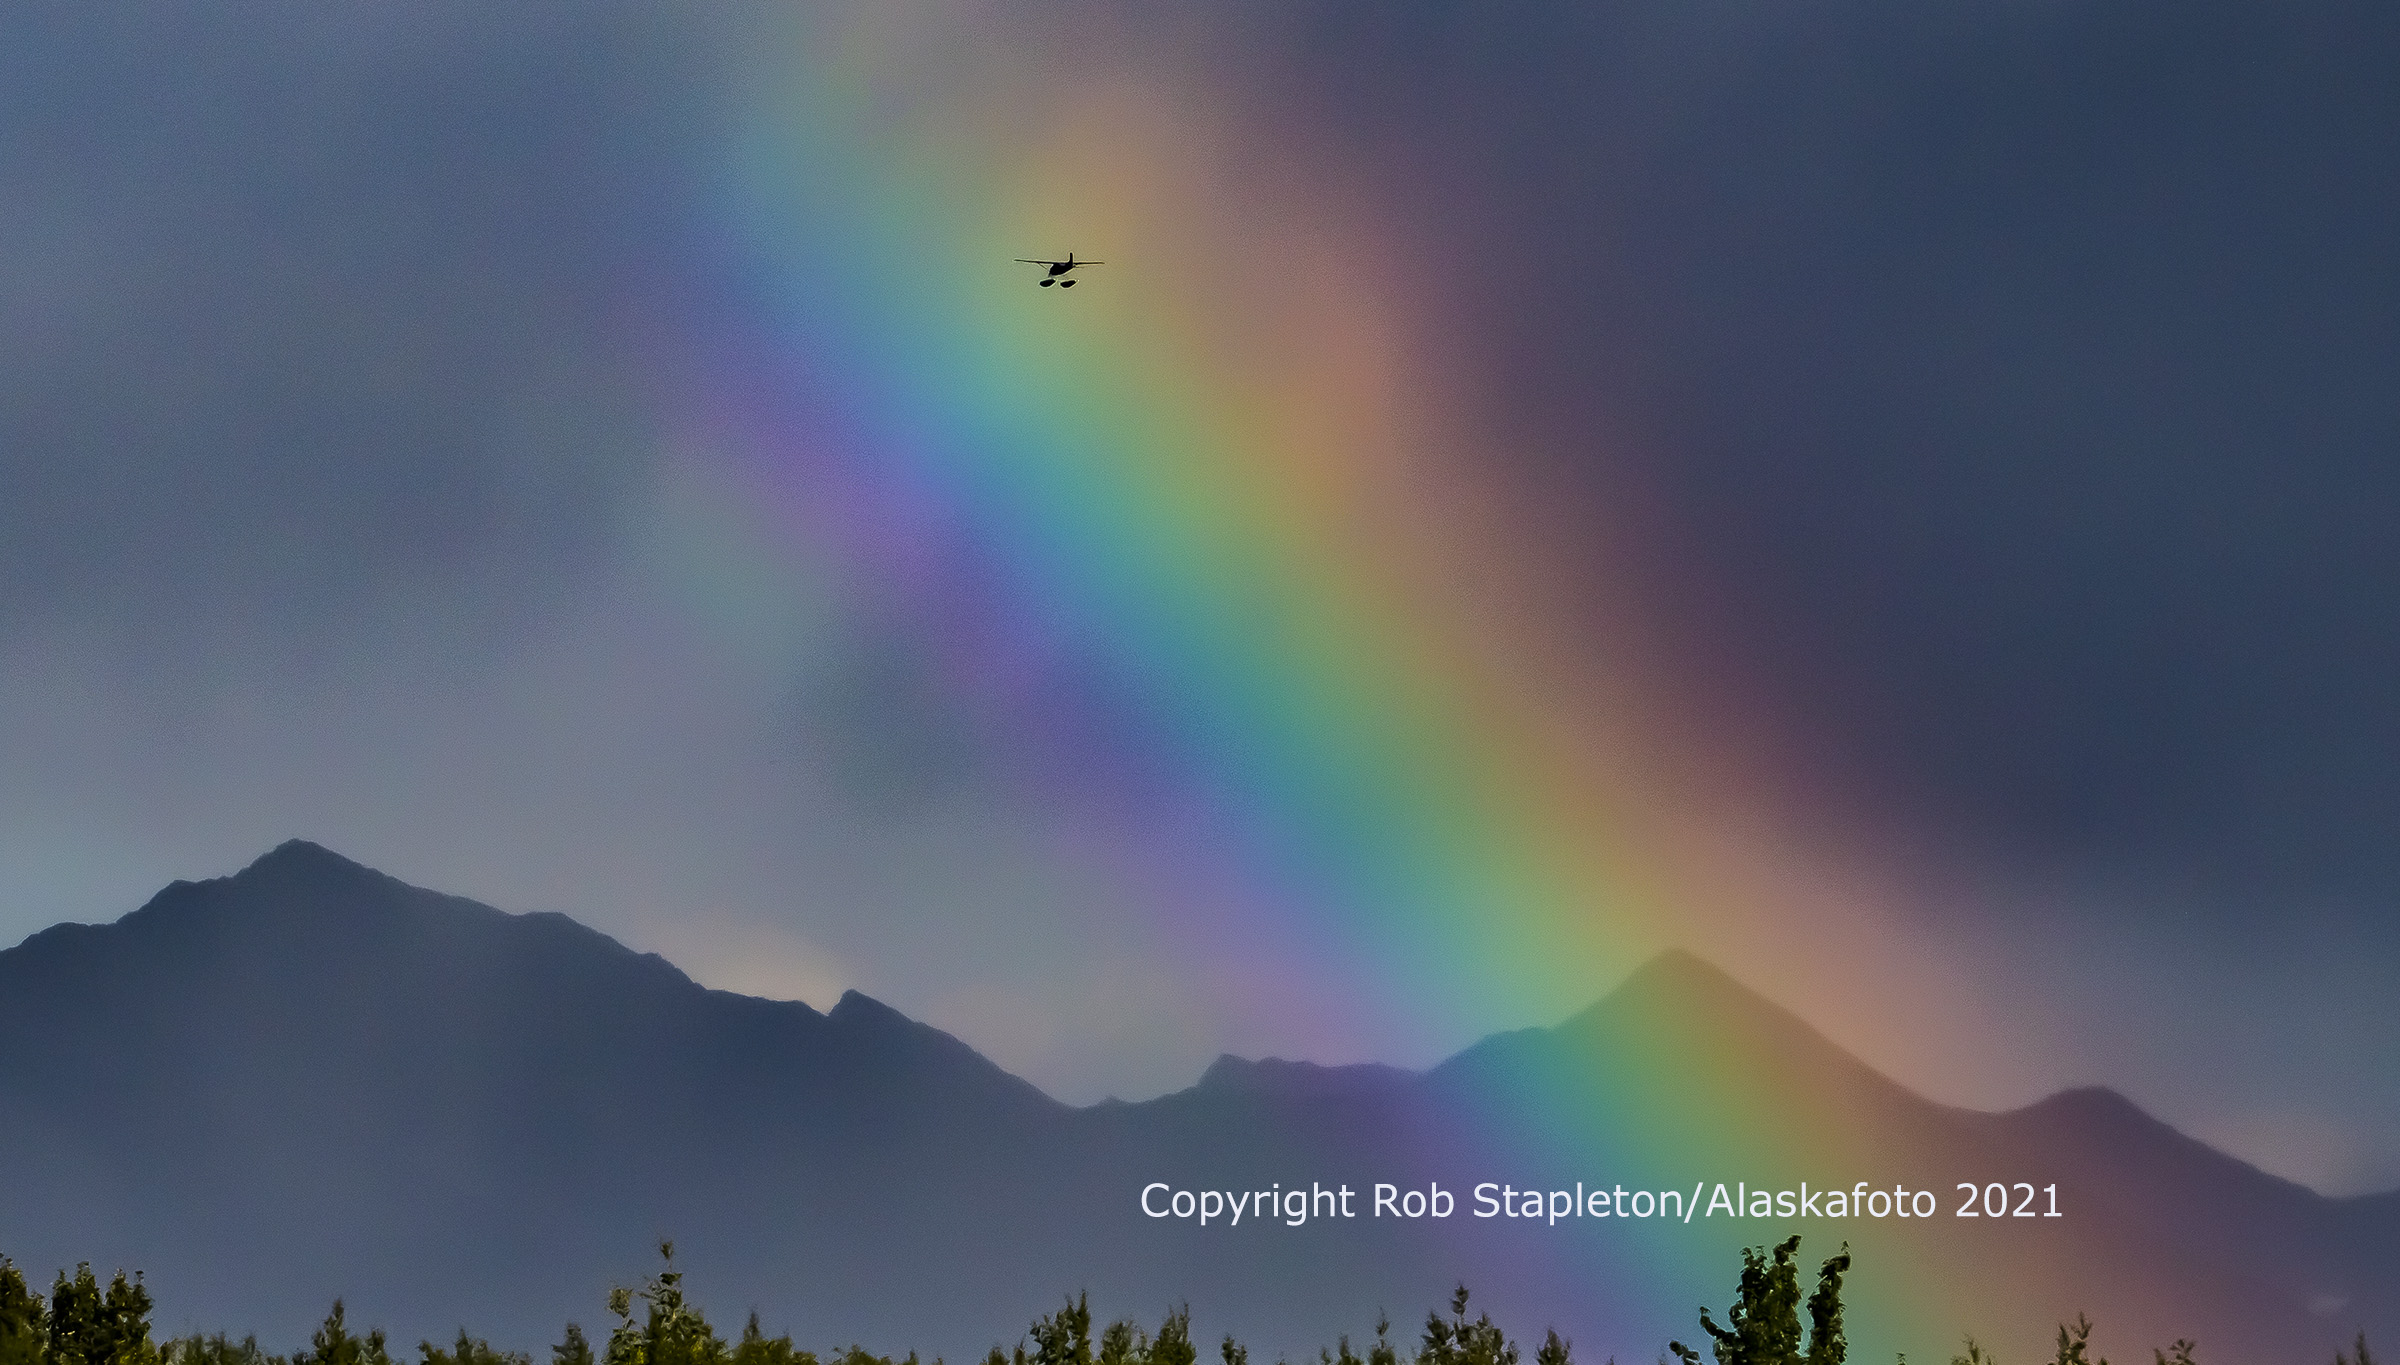
Finally getting to the reason for this blog post. Rainbow photography. The best photographs of rainbows are made with a polarizer on the lens of the camera used (see above). Most normal 50mm to 200mm focal lengths render better rainbow images than wide angle or extreme telephotos, but those to will provide more color in the arc of the rainbow when used with a polarizing filter.
Try to position yourself making sure there is no clutter in the front of the rainbow unless it adds to the composition of the scene. Also, rainbows are best photographed when the sun is low on the horizon. But don’t blink because they don’t last long when clouds are parting, and showers are still falling. If the wind is blowing, they won’t last more than seconds.
The rainbow spectrum arch contains the colors ROY G BIV- red, orange, yellow, blue Indigo, and violet colors. They may also form and photographed at waterfalls or water fountains, anywhere where water is being dispersed and sunlight is hitting the droplets.
My advice…get a polarizer and keep it in your vest or camera bag. You will be surprised how often you will end up using it.